Creating your own wedding veil can be a rewarding and budget-friendly endeavor that adds a personal touch to your special day. Did you know that many brides find commercial veils to be outrageously priced? By choosing to make your own, you not only save money but also gain the freedom to design a piece that perfectly complements your bridal style. Whether you’re seeking a classic, elegant look or something unique and trendy, a DIY veil allows you to express your individuality and creativity. This tutorial will guide you through the essential materials and straightforward steps needed to craft a stunning veil that reflects your vision and enhances your wedding attire. Let’s dive in and explore the joy of creating something beautiful for your big day!
Choosing the Right Wedding Veil Style for You
Choosing the perfect wedding veil can transform your bridal look, adding elegance, grace, and a touch of personal flair. With so many styles available, it’s essential to consider various factors that reflect your unique taste and complement your overall wedding attire. Start by thinking about your dress design; the veil should enhance, not overpower. For example, a lace veil pairs beautifully with a vintage-style gown, while a sleek, modern dress might call for a minimalist tulle design.
Consider the length of the veil as well, which can dramatically affect your silhouette. Foot-length or shoulder-length veils offer a playful touch, whereas cathedral or chapel-length veils exude dramatic elegance, ideal for formal ceremonies. It’s also worth thinking about how you plan to wear your hair. If you’re opting for an updo, a shorter veil may enhance your hairstyle, while longer styles can beautifully frame your face.
Beyond aesthetics, think about the practical aspects as well. A heavier veil with embellishments may require more secure placement, while a lighter veil can be easier to manage throughout the day. When in doubt, try on different styles with your dress to see what feels right. This allows you to visualize how the veil interacts with your overall look. Remember, your wedding day is about showcasing who you are, so choose a veil that resonates with your style-one that makes you feel radiant as you walk down the aisle.
Essential Materials for Your DIY Wedding Veil
Creating your own wedding veil can be a rewarding and creative endeavor, allowing you to add a personal touch to your bridal ensemble. To begin this journey, it’s essential to gather the right materials that cater to your design vision and comfort. The beauty of a DIY veil lies not only in its uniqueness but also in the ability to tailor it to your specific wedding theme, dress style, and personal preferences.
Start with the foundational fabric. Tulle is a popular choice due to its lightweight and airy quality, often used in both long and short veils. If you’re aiming for a more luxurious feel, consider organza or lace, which can lend elegance and texture to your design. When selecting fabric, ensure it complements your dress and fits within your comfort zone-some fabrics may require additional care when wearing.
Next, you’ll need a headpiece or comb to secure the veil in place. A good comb will help distribute the weight of the fabric, keeping your veil steady as you move. You might also include decorative elements like ribbons, beads, or appliqués, which can enhance the veil’s visual appeal while making it truly your own. Crafting tools are equally important-scissors, a needle and thread, and fabric glue will be essential in assembling and finalizing your creation.
Lastly, prepare for the finishing touches: a measuring tape to ensure your veil is the perfect length, and perhaps even a friend or two to help hold the fabric and give feedback. With these materials in hand, you’re ready to embark on a creative journey that will not only yield a beautiful veil but also become a cherished part of your wedding story. Embrace the process and enjoy the celebration of your love as you craft a veil that reflects your distinct style and personality.
Step-by-Step Instructions to Craft Your Veil

To embark on the exciting journey of crafting your own wedding veil, begin by gathering all your essential materials and finding a comfortable workspace. Creating a beautiful veil can be a joyful process, and taking it step-by-step will ensure a polished final product that reflects your unique style.
Start with the fabric you’ve chosen-whether that’s delicate tulle for a romantic look or luxurious lace for something more opulent. Cut it to your desired length, bearing in mind that longer veils can add drama, while shorter ones can offer a playful touch. A general rule of thumb is to cut the fabric at least double the length of your desired style to allow for gathers or folds. Once cut, it’s helpful to lay the fabric flat and give it a light press with an iron on a low setting to remove any creases, making it easier to work with.
Next, create the veil’s attachment point. Take your hair comb or headpiece and, using your needle and thread, securely stitch the gathered edge of the fabric to the comb. Make sure to distribute the fabric evenly to avoid any bulkiness. For added security, you might use fabric glue as well, allowing it to dry completely before handling the veil further. Once the fabric is attached, consider adding embellishments such as beads, sequins, or appliqués. This step allows for creativity; think about what details resonate with your wedding theme.
Lastly, once your veil is fully assembled, try it on to ensure it sits comfortably and looks how you envisioned. Adjust as necessary-perhaps trimming the length or re-sewing parts to achieve your desired flow. To finish, carefully fold your completed veil, using soft storage to keep it wrinkle-free until your big day. Embrace this creative endeavor, and remember that the time spent creating your veil adds a personal touch that enhances your bridal experience, making your wedding day even more special.
Adding Personal Touches: Customizing Your Veil
When it comes to personalizing your wedding veil, your creativity can truly shine. This accessory not only serves as a beautiful adornment but also tells your unique love story. Consider incorporating elements that are meaningful to you, such as family heirlooms, colors that reflect your wedding theme, or motifs that represent shared interests with your partner. These details can elevate your veil from a simple fabric piece to a treasured symbol of your journey together.
One popular way to customize is by adding embellishments. Whether you prefer delicate lace appliqués, sparkling beads, or even feathers, the options are endless. For instance, if you’re having a garden wedding, sewing on floral patches or embroidering blossoms that match your bouquet can create a lovely cohesion. Alternatively, if you’re embracing a vintage theme, consider using antique brooches or fabric from a loved one’s wedding gown as part of your veil design. Using custom colors in your veil, such as a subtle tint or ombre effect, can also highlight your wedding palette in a refined way.
Another effective approach is to experiment with the veil’s silhouette and length. This could involve pleating, adding layers, or incorporating different fabrics to create dimension. For an even more personalized touch, think about symmetry – perhaps a longer veil at the back that trails lightly onto the floor, complemented by a shorter lace-edged panel framing your face. Each small decision you make contributes to how the veil will reflect not only your style but also your personality.
Lastly, document your process! As you create, take photographs or keep a journal about your thoughts and inspirations. This not only adds to the joy of making but can serve as a cherished keepsake, reminding you of the excitement and creativity that went into crafting your beautiful veil. Embrace this opportunity for personalization, and let your veil become a reflection of your love story and individuality.
Frequently Overlooked Tips for a Flawless Finish
When crafting your wedding veil, achieving a flawless finish is essential to ensure that your hard work shines through on your big day. One often-overlooked aspect is the importance of seam finishing techniques. Frayed edges can detract from the elegance of your veil, so consider using a zigzag stitch or a serger to securely finish the edges, preventing any unruly threads from ruining the delicate look. Additionally, consider folding the edges over and using a straight stitch to create a neater appearance. This method can also provide extra durability if you’re working with sheer fabrics.
Another crucial tip lies in the choice of materials. While you may be tempted to opt for the softest tulle on the market, remember that not all fabrics hold their shape well. For a more structured veil, look for fabrics with a slight stiffness-organza or crinoline can offer that desired lift, especially for a dramatic look. If your design incorporates lace or intricate embellishments, pre-washing your materials can help them drape better and remove any manufacturer finishes that may impact the final look.
It’s also wise to test your veiling construction under different lighting conditions. Natural light can change the way colors and textures appear. If possible, wear your veil in varied lighting or take photos to see how it looks in different scenarios. This ensures that when you walk down the aisle, your veil captures the light beautifully, enhancing your overall bridal look.
Lastly, don’t underestimate the power of proper veil folding and storage leading up to your wedding day. Store your veil flat or rolled to minimize creases, and consider placing it with archival tissue paper in a breathable box to keep it in pristine condition. If you find minor wrinkles, a gentle steam from a distance can help restore its original form without damaging the delicate fabric. Taking these extra steps will not only give you a stunning veil but also peace of mind as you prepare for your big moment.
Budget-Friendly Options for DIY Veil Making
Creating a stunning wedding veil doesn’t have to come at a hefty price tag. With some creativity and resourcefulness, you can craft a beautiful accessory that reflects your unique style while staying within your budget. Many brides-to-be find that DIYing their veil not only saves money but also becomes a cherished part of their wedding planning journey.
To keep costs down, start by sourcing materials from budget-friendly fabric stores or online retailers. Look for affordable options like tulle, which is available in a variety of colors and widths. Another great choice is organza, which provides structure and sheen without breaking the bank. Consider shopping during clearance sales or using coupons to further reduce your expenses. Additionally, thrift stores or estate sales can occasionally yield vintage lace or embellishments that can add character to your veil at a fraction of the cost.
If you need to keep your project ultra-low-budget, consider repurposing materials you already have. For example, an old wedding dress can be a treasure trove of fabric and lace that can be transformed into a lovely veil. Remember to get creative with embellishments; small flowers, beads, or even a simple ribbon can elevate your design without significant expense.
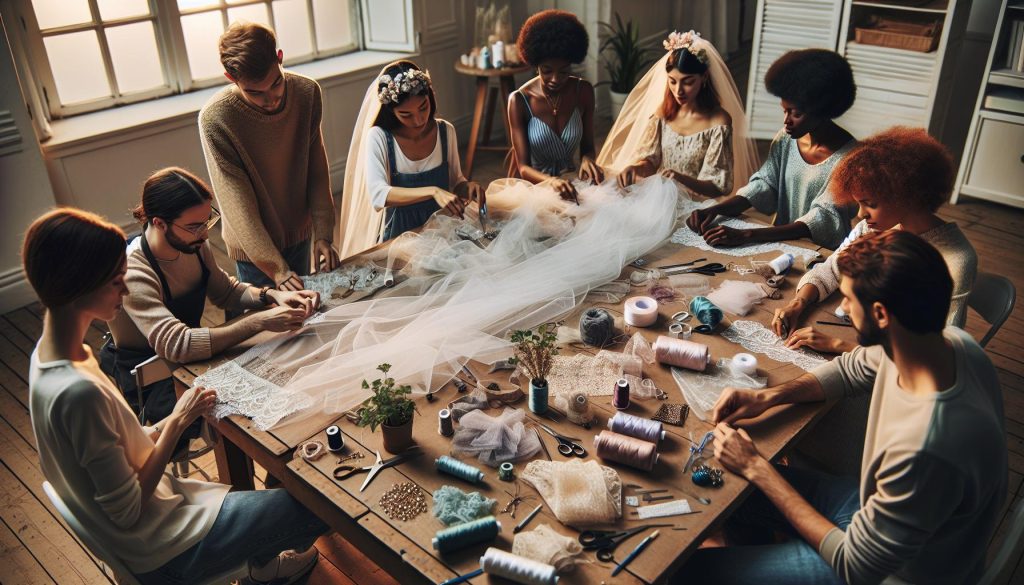
Finally, enlist the help of family or friends who might have sewing skills. Hosting a DIY veil-making session can be a fun way to bond and share ideas while working toward a beautiful end product. With these budget-friendly strategies, you can create a personalized wedding veil that perfectly complements your big day, making your wedding an even more memorable event.
Troubleshooting Common Veil-Making Mistakes

Creating your own wedding veil can be a rewarding experience, but it can also come with its share of challenges. By anticipating common pitfalls and knowing how to address them, you can turn potential setbacks into opportunities for improvement, ensuring your veil is nothing short of perfect for your big day.
One frequent issue is unevenness in the fabric cut. To avoid this, always measure and cut your fabric on a flat surface with a sharp pair of scissors or rotary cutter. Lay the fabric out smoothly, and double-check your measurements before cutting. If you do find that your veil is uneven, don’t panic. You can hem the edges to create a more streamlined look; just make sure to use a straight stitch for a clean finish.
Another common mistake is the miscalculation of length or placement. It’s crucial to visualize how the veil will fall and frame your face. A simple yet effective trick is to use a measuring tape to mark the desired length directly on yourself with fabric chalk. If you’ve already cut the veil and find it too short, consider adding a decorative trim or layering additional pieces of fabric to create more volume and length without compromising the design.
Embroidery and embellishments can also lead to unexpected challenges, such as misplaced accents or areas that don’t hold up well over time. To remedy this, always secure embellishments with a sturdy thread and consider using fabric glue for smaller items. Practice on a scrap piece of fabric to get the hang of your technique. If you’ve already made mistakes, gently remove or reposition embellishments using seam ripper tools or carefully cutting away stitches, then reattach in the correct locations.
Lastly, be prepared for structural issues like sagging or lack of volume. If you are experiencing a limp veil, consider adding a crinoline or another structured fabric underneath for support. If it’s too heavy, lightweight fabrics like tulle or organza can be layered to maintain volume without the excess weight.
DIYing your veil allows for personal expression, and even mistakes can add to the creativity. Embrace the process, learn from missteps, and remember-there’s no “perfect” when it comes to personalization, just a unique piece that tells your story!
Inspiration: Unique Wedding Veil Ideas

When it comes to personalizing your wedding look, the veil can be more than just an accessory; it can be a statement piece that reflects your unique style and story. Whether you envision a classic, ethereal look or something more unconventional, there are countless ways to get creative with your DIY wedding veil. Here are some inspiring ideas to help you craft a veil that resonates with your vision.
Floral Embellishments
Bring a touch of nature to your bridal ensemble by incorporating floral designs. Use silk flowers or fabric flowers in your veil’s design, seamlessly enhancing its beauty. You might create a floral crown that merges with the veil or stitch blooms along the edges for a romantic look. Consider seasonal flowers that hold significance for you and your partner, adding a personal touch to this timeless accessory.
Lace Details
For those who lean toward the vintage aesthetic, adding lace to your veil can create an eye-catching blend of tradition and elegance. Select lace trims to attach around the edges or layer a lace piece over tulle for a multi-dimensional effect. This approach not only elevates the design but also allows you to incorporate heirloom lace for deep personal significance, making your veil a cherished keepsake.
Color Pop
Who says veils have to be purely white? Experiment with different shades that complement your wedding color palette. Soft pastels, bold hues, or even metallics can add a breath of fresh air to the classic veil look. This option is particularly appealing for modern weddings, where couples are often breaking traditional barriers. A blush or champagne veil can soften your ensemble while offering a contemporary twist.
Unique Shapes and Lengths
Dare to break away from conventional two-tiered veils. Explore various lengths and shapes-think floor-length, cathedral veils, or even shorter blusher veils that offer a chic attitude. Consider asymmetrical cuts or playful silhouettes that match your wedding dress style. A longer veil can create a sense of drama in your ceremony, while a shorter one may confer a playful, modern vibe suitable for a lively reception.
By embellishing your veil with personal touches and considering modern updates to traditional styles, you can create a stunning look that mirrors your personality and love story. It’s this blend of creativity and sentiment that transforms your wedding veil from a mere accessory to an integral part of your bridal ensemble. Celebrate your journey and craft something truly one-of-a-kind that will be cherished in photographs for years to come!
Veil Care and Storage Tips after the Wedding
Caring for your wedding veil after the big day is an essential step in preserving its beauty and sentimental value. Many brides treasure their veils and want to ensure they remain in pristine condition for future wear or display. Proper care and storage not only keep your veil looking stunning but also can allow you to pass it down through the generations as a cherished heirloom.
To maintain your veil’s elegance, it’s important to follow a few simple yet effective care tips. First, inspect your veil for any dirt or stains after the wedding. If you notice any spots, gently clean them with a mild soap and water solution, being careful not to scrub too hard to avoid damaging the fabric. Depending on the materials used, you may also want to seek out a professional cleaner who specializes in delicate fabrics, especially if your veil contains lace or embellishments that could be easily harmed.
Once your veil is clean, it’s time to focus on storage. To keep it safe from dust and potential damage, consider the following methods:
- Hang it Properly: If you’re storing a long veil, hang it on a padded hanger in a cool, dry place. Avoid using wire hangers, as they can create creases and deform the shape.
- Use a Garment Bag: For a short or more delicate veil, place it in a breathable garment bag made of cotton or acid-free tissue paper. This will protect it from dust while ensuring it can still breathe.
- Avoid Direct Sunlight: Keep your veil away from direct sunlight to prevent fabric fading and deterioration over time.
It’s wise to periodically check on your veil, especially if it’s stored for a long time. If you plan to display it, consider using a shadow box or a frame designed for textiles, allowing you to showcase it beautifully while keeping it protected from physical harm.
With thoughtful care and storage, your wedding veil will not only remain a symbol of your special day but also might serve as a beautiful piece of family history for generations to come.
Complementing Your Veil with Bridal Accessories
Choosing the right accessories to complement a wedding veil can elevate your entire bridal look, ensuring you radiate elegance on your special day. Accessories like hairpieces, jewelry, and even makeup can bridge the gap between your veil and your overall ensemble, creating a cohesive and enchanting appearance. Whether you opt for a traditional or modern style, understanding how to harmonize these elements is key to achieving your desired aesthetic.
One of the most impactful choices is the headpiece or hair accessory you select to pair with your veil. For instance, if your veil features delicate lace, enhancing your look with a floral headband or diamond-encrusted tiara can create a balanced, harmonious feel. Consider using statement hairpins or ornate combs to add glamour and help secure your veil, especially if it is long and flowing. If you’re feeling adventurous, mixing textures-like a sleek veil with a textured hairpiece-can add depth to your bridal look.
Jewelry also plays a crucial role in a well-rounded wedding outfit. When selecting earrings or a necklace, aim for pieces that complement rather than overshadow your veil. For example, if your veil is embellished with pearls, wearing pearl earrings can create a beautiful synergy. On the other hand, if you’re opting for a more minimalist look with a simple veil, consider bolder accessories to make a statement, like chandelier earrings or a dramatic bracelet that adds sparkle without clashing with your veil’s design.
Lastly, don’t underestimate the power of makeup in tying your entire look together. A subtle, classic bridal look can work well with a long, flowing veil, while a bolder lip color can transform a simple veil into a statement piece. Keep in mind the overall color palette of your wedding to ensure all your accessories, including your veil, harmonize with the theme.
By thoughtfully selecting these elements, you can create an unforgettable bridal look that celebrates your personal style while honoring the significance of your wedding veil, making for an enchanting presence on your big day.
Understanding the Traditions Behind Wedding Veils
Throughout history, wedding veils have been woven into the fabric of marriage traditions, serving as symbols of purity, modesty, and even protection. As modern couples explore personal styles and unique interpretations, understanding the origins and meanings behind these beloved accessories can add a layer of significance to your special day. From various cultural practices to the transformation of veil styles over time, the journey of the wedding veil reflects the evolution of marriage ceremonies themselves.
In many cultures, the act of wearing a veil dates back centuries. Historically, in Western traditions, the white wedding veil has been associated with the virginity of the bride, signaling her purity and commitment to her partner. This symbolism was further reinforced in the 19th century when Queen Victoria popularized white wedding dresses, and the accompanying veil became a staple in bridal attire. Today, while the meanings may shift, many brides still embrace this time-honored garment, celebrating its rich heritage while infusing it with their personal flair.
Different cultures offer diverse perspectives on veils, reflecting their unique customs and beliefs. For instance, in Jewish weddings, the bride is often covered with a veil during the ceremony, signifying modesty and the sanctity of the union. Similarly, in some Middle Eastern cultures, intricate veils and headscarves can signify a woman’s connection to her faith and heritage. Understanding these traditions can inspire couples to incorporate elements that resonate with their backgrounds, creating a wedding experience that honors both their roots and their new beginning.
When creating your own wedding veil, consider the elements that speak to you personally. Whether you choose to adopt traditional designs or opt for a contemporary twist, your veil can be a powerful expression of your identity as a couple. As you embark on the crafting process, take pride in knowing that you are not only making a beautiful accessory but also weaving your stories into a time-honored practice. By appreciating the significance behind this garment, you can ensure that your wedding veil captures your journey and adds a meaningful touch to your celebration.
Sharing Your DIY Experience: Tips for Future Brides
Creating your own wedding veil can be a delightful journey, allowing you to express your personality and style on one of the most significant days of your life. Many brides find that sharing their DIY experiences not only helps them reflect on their choices but also inspires future brides to embark on a similar creative path. From the initial concept to the final stitch, documenting your process can be both rewarding and educational.
Start by sharing your materials and tools. Future brides will appreciate knowing exactly what you used-whether it was lace, tulle, or a unique fabric. Recommend different sourcing options, such as local craft stores or online retailers, emphasizing budget-friendly choices. Including photos of your materials at the beginning of your crafting journey can be quite motivating for others.
Next, delve into your step-by-step creation process. Highlight any challenges you faced and how you overcame them, as this transparency can be immensely helpful. Did you find a fantastic way to attach embellishments that worked wonders? Perhaps you learned a simple sewing technique that transformed the overall look of your veil. Sharing these tips enriches the experience for others and reinforces a supportive community of brides.
Consider including a reflections section after you complete your veil. Discuss what you loved about the process, changes you might make next time, or how the finished product felt on your wedding day. This insight is not just about the exterior product; it reflects the emotional journey of crafting something personal and meaningful. Encourage future brides to embrace imperfections, as they often add character to handmade items.
To further enhance the sharing experience, create a visual gallery by compiling photos from the different stages of your veil-making process. This can serve as a helpful reference for future DIY enthusiasts, guiding them through the journey from conception to completion. By encouraging interaction, such as asking others to share their own tips or experiences, you can foster an engaging environment that celebrates all aspects of wedding planning.
Ultimately, your story-filled with personal touches, practical advice, and shared reflections-can empower other brides to explore their creativity and individuality through the beautiful tradition of crafting their own wedding veils.
Faq
Q: What materials do I need to make a wedding veil?
A: To make a wedding veil, you will need tulle or lace fabric, a comb or headpiece, fabric scissors, needle and thread, and optional embellishments such as beading or ribbon. Make sure you have a spacious area to work and a sewing machine for faster assembly if preferred.
Q: How long should a DIY wedding veil be?
A: The length of a DIY wedding veil typically depends on your style preference. Common lengths include fingertip (about 36 inches), chapel (around 90 inches), and cathedral (over 100 inches). Consider your dress’s design and your personal taste when deciding on length.
Q: Can I customize my DIY wedding veil with embellishments?
A: Yes, customizing your DIY wedding veil is highly encouraged! You can add embellishments like lace trim, sequins, or embroidery to match your wedding theme. This personal touch makes your veil unique and special, reflecting your individual style.
Q: How do I attach the veil to my hairstyle securely?
A: To securely attach your veil, sew or glue it to a comb, then slide the comb into your hairstyle. For added security, you can use bobby pins to pin the veil into place, ensuring it stays put throughout your big day.
Q: What are some common mistakes to avoid when making a wedding veil?
A: Common mistakes include selecting the wrong fabric type, not measuring correctly, or failing to secure embellishments properly. Always test your veil’s fit with your hairstyle and dress beforehand to make any necessary adjustments.
Q: How do I care for my DIY wedding veil after the wedding?
A: After the wedding, store your DIY wedding veil in a cool, dry place. Hang it in a breathable garment bag to prevent damage. If it becomes wrinkled, lightly steam it or hang it in a steamy bathroom to remove creases.
Q: What styles of wedding veils can I choose for a DIY project?
A: Popular DIY wedding veil styles include mantilla, birdcage, and drop veils. Each style offers a different look and vibe, allowing you to choose one that complements your wedding gown and personal style.
Q: Where can I find inspiration for DIY wedding veil designs?
A: You can find inspiration for DIY wedding veil designs through wedding blogs, social media platforms like Pinterest, and bridal magazines. Exploring various styles will help you choose elements that best suit your vision for the wedding day.
Closing Remarks
Congratulations on taking the step to create your own wedding veil! This DIY approach not only allows you to personalize your look but also adds a heartfelt touch to your special day. If you found our tutorial valuable, don’t stop here-explore our guide on choosing the perfect wedding venue that suits your style, or check out our budget planning tips to ensure every detail of your wedding is just as you envision it.
Act now to ensure you have all your wedding essentials in place! Remember to engage with us-share your creation or any questions you might have in the comments below. For continuous inspiration and more DIY projects, consider subscribing to our newsletter. Together, let’s make your wedding planning journey as joyful and memorable as the big day itself!